Monday, July 27, 2020

#PuckLife

After a COVID caused postponement of the hockey season back in mid-March, hockey is finally coming back!  This warms my cold Canadian heart.

On my Shelf Of Awesomeness I have a figure of famed goalie  Ed Belfour wearing the white and blue of the Toronto Maple Leafs.  I decided I'd try to make an image to celebrate the return of hockey with this figure.

Goaltenders need a net to tend (hence the name) otherwise their just super awkward defensemen. I don't have a net, so I decided to make one (project!  insert manly squee sound here).

Looking at official NHL goal measurements I decided I needed the opening to be 7" wide by 4.5 inches tall (a regulation net is 6'x'4').  

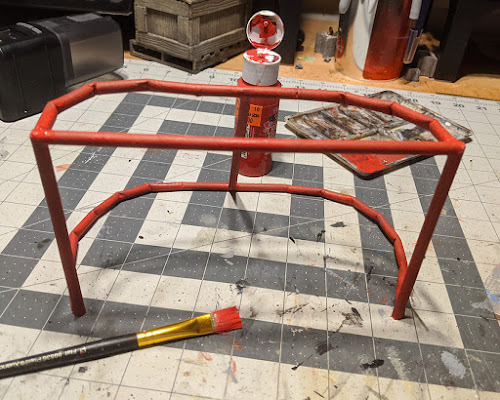
Straws make good pipes, but plastic straws don't glue well, so I went with paper straws.  A few minutes, and several super-glued fingers later, I had the basics:

Next step is to prime it for painting.  So I grab a can of spray primer and head outside... to find a thunderstorm about to descend.  Nerts!

So I quickly get to work and spray the ever living heck out of the frame - rush job, but finished just a few seconds before the first drops fell.
I brought it inside to dry... which is fume-y, but not as fume-y as the spraying itself, so it wasn't too bad.

Once the primer dried, I hit it with some classic red.
The next step is to find something to use as the netting.  I looked high.  I looked low.  I even put a call out to fellow makers on the Internets.  I first settled on the net from the kids insect grabbing thinger.  IT was perfect.  It was white... It was... 2 inches too small.

Unfortunately that didn't become obvious until I already destroyed the grabber thinger... Oh well.

I eventually found the net I needed in a bag of onions.  Well, specifically it *is* the bag of onions.  Not the right colour, but the right size.  This is the "Do I have enough?" test fit.
With a clever application of an x-acto knife, the scissors from my Leatherman, and super glue, I managed to get the net formed over the frame.  
It does look dang good, doesn't it?   

NHL nets have padding along the bottom, and the back crossbar.  I think part of this is safety, and part is to hide some electronics, like the back-of-net camera. I used some paper to mimic this. 

I then covered the whole thing in a coat of Mod Podge to give the net some strength, then I dry brused on white to the net.  Some final touch-ups to the red and I had my finished net.


I made a rink out of a big piece of foam, painted white, with a cut out to accomodate the base of the goalie figure.

I then made some simple boards out of more foam. Then placed it all in my light box:
The rest is Photoshop magic, which led to the final image:

Wednesday, July 01, 2020

Winging It: The Adventures Of Indiana Frog: Hollywood Magic?

This post is the finale of a series of posts that feature me winging the creation of a "round rock chasing Indy through the ancient temple access tunnel"diorama with which to make an image with my Kermit The Frog/Indiana Jones hybrid action figure. If you missed the action, you can start back on the first post.

I have no idea what I am doing, and no plan (just a finished shot in my head), but that didn't slow me down.

Whence last we spoke, I had put the finishing touches on the diorama. It looks like this:
To do the photography part of this I tossed it into my lightbox.  I do 90% of my toy photos in that lightbox, so I just assumed I'd be using it for the final image.  However as I was placing the diorama into the lightbox I had a panic moment.  I never actually measured the full length of the dioraama, and I wasn't sure it would fit.

Turns out it did - with several inches to spare. Tighter than I like, but its all I need - almost like I planned it that way (which at this point you should realize I absolutely didn't).  The rest is all basic toy photography - pose the figure, frame up the shot, and press the shutter.

After a few test shots I decided to add a light shining down on Kermit to get some highlights, and separation from the background.  I used a Lume Cube with barn doors attached, mounted on a pair of adjustable arms secured by a Platypod to provide this extra light.

To get a basic shot took maybe 10 minutes.  However I decided to add some motion to the shot by tossing in some dirt at Kermits feet at the last minute, giving (hopefully) the effect of him kicking up dirt as he ran from the Big Ball of Death.  

So I put my camera on high shutter mode, grabbed a remote shutter release, and tried to get my left hand (on the shutter release) and my right hand (throwing dirt), to coordinate enough to get the right about of flying dirt to be believable.  This took an extra 30 minutes and a couple hundred frames. (My left hand really doesn't know what my right hand is doing. I have proof).

These are a couple of the frames I grabbed.  Together they made the basis of the final shot:


Now to Photoshop! This is where the  Hollywood Magic really comes into play.  I didn't really do much I don't normally do when I process photos - crop in, remove the joints from the figure, colour correct etc. so I'll keep the remaining commentary to what I needed to adjust to make the diorama work in the shot.

Fortunately it wasn't a lot.  Aside from cropping and a slight straighten, I filled in some places near the top where the light leaked in (you can see one obvious one to the left of the ball at the very top of the frame).  I also removed a vine near his right knee, and one of the hanging vines on the right of the frame.  This is mainly due to them being a bit distracting in the final image.  

The final shot in all its glory, looks like this:


Personally I think the shot is a massive success.  I am super pleased with how it turned out.

Thinking back on the process, I am not entirely sure I would have done much differently.  I mean, there are a dozen and a half things I would change if this was going to be a display piece.  I would have adjusted the vines I removed in Photoshop on the actual diorama, to give one obvious example.  However this isn't meant to be a display piece (which is good, as I don't have a place to display it anyway).  It was intended for the sole purpose of giving me the tools to create an image - to scratch a creative itch, as they say.  In that it worked out well.

Now, what should I make next?

Winging It: The Adventures of Indiana Frog: The Final Touches

I am in the process of winging the creation of a "round rock chasing Indy through the ancient temple access tunnel"diorama with which to make an image with my Kermit The Frog/Indiana Jones hybrid action figure.

I have no idea what I am doing, and no plan (just a finished shot in my head), but that isn't slowing me down.

Last post I got the dirt roughed in.
I wasn't super thrilled with the colour of the dirt, but I decided to just go with it. Either its gonna work out in camera, or I can futz with the colours in Photoshop (yay movie magic!)  The dirt, which is real dirt from my back yard, is only held with glue from below.  It needs to be held in more firmly. I sprayed the entire diorama with a mix of water and white glue (approx 3 parts water, 1 part glue), and left it to dry. 

While waiting I decided to tackle the big ball of death.  I had left it with a black undercoat as I wasn't sure what colours I wanted to paint it at the time.   I now had a much better idea - the same basic rock look, but a lighter grey than the rest of the tunnel.  I started with the same dark undercoat I gave the rest of the rocks.
I then used the same drybrushing technique I used on the rest of the stone, except this time I finished it off with a vanilla colour to give brighter highlights to the ball.
It looks pretty good.  I like the stone texture that came out of it.  To add a bit more realism, and tie it in to the rest of the diorama, I lightly rubbed some of the dirt I used everywhere else onto the ball.

That sorted it is back to finishing off the tunnel. The glue spray mixture has dried.  I have never used that technique before so I was nervous the glue residue would ruin the look, but seemed to do exactly what I hoped it would do:  lock in the dirt, but otherwise dry transparent. It worked like a treat.

Now all that is left is to add some vines and other vegetation.  I have a small collection of moss and other vegetations I picked up along the way from visits to various model stores and dollar stores.  I rarely use them, but I have it, so might as well take advantage of it.  My other option is to go spelunking outside for bits, but I am doing this at night, and its humid as hell outside. (seriously, I let the dog out and my glasses immediately fogged up)

I attached some fake spanish moss to the ceilings to act as vines using hot glue. I also added some other bits to the base of the rock.  I sealed that in with another good spritz of the water/glue mixture.

I think this is done. The ceiling still looks like crap, but as mentioned in a previous post the ceiling isn't going to be in the final shot.  Its sole purpose is to give the vegetation something to be glued to.  In that mission it serves its purpose perfectly.

I am considering this finished, and ready for the camera. However that glue spray still needs to dry, so I am going to let this sit for now.

Stay tuned for the results of