Showing posts with label action figures. Show all posts

Monday, July 27, 2020

#PuckLife

After a COVID caused postponement of the hockey season back in mid-March, hockey is finally coming back!  This warms my cold Canadian heart.

On my Shelf Of Awesomeness I have a figure of famed goalie  Ed Belfour wearing the white and blue of the Toronto Maple Leafs.  I decided I'd try to make an image to celebrate the return of hockey with this figure.

Goaltenders need a net to tend (hence the name) otherwise their just super awkward defensemen. I don't have a net, so I decided to make one (project!  insert manly squee sound here).

Looking at official NHL goal measurements I decided I needed the opening to be 7" wide by 4.5 inches tall (a regulation net is 6'x'4').  

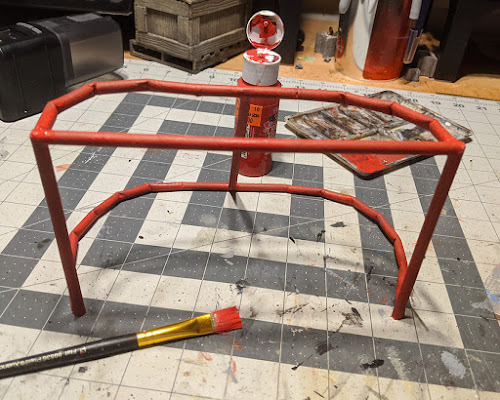
Straws make good pipes, but plastic straws don't glue well, so I went with paper straws.  A few minutes, and several super-glued fingers later, I had the basics:

Next step is to prime it for painting.  So I grab a can of spray primer and head outside... to find a thunderstorm about to descend.  Nerts!

So I quickly get to work and spray the ever living heck out of the frame - rush job, but finished just a few seconds before the first drops fell.
I brought it inside to dry... which is fume-y, but not as fume-y as the spraying itself, so it wasn't too bad.

Once the primer dried, I hit it with some classic red.
The next step is to find something to use as the netting.  I looked high.  I looked low.  I even put a call out to fellow makers on the Internets.  I first settled on the net from the kids insect grabbing thinger.  IT was perfect.  It was white... It was... 2 inches too small.

Unfortunately that didn't become obvious until I already destroyed the grabber thinger... Oh well.

I eventually found the net I needed in a bag of onions.  Well, specifically it *is* the bag of onions.  Not the right colour, but the right size.  This is the "Do I have enough?" test fit.
With a clever application of an x-acto knife, the scissors from my Leatherman, and super glue, I managed to get the net formed over the frame.  
It does look dang good, doesn't it?   

NHL nets have padding along the bottom, and the back crossbar.  I think part of this is safety, and part is to hide some electronics, like the back-of-net camera. I used some paper to mimic this. 

I then covered the whole thing in a coat of Mod Podge to give the net some strength, then I dry brused on white to the net.  Some final touch-ups to the red and I had my finished net.


I made a rink out of a big piece of foam, painted white, with a cut out to accomodate the base of the goalie figure.

I then made some simple boards out of more foam. Then placed it all in my light box:
The rest is Photoshop magic, which led to the final image:

Friday, June 26, 2020

Winging It: The Adventures Of Indiana Frog, Day 1

I am sometimes asked where I get some of my action figures from. This post isn't about that - its about diorama making,  but the answer may surprise you just the same.

I have recently come into possession of an Indiana Jones/Kermit The Frog hybrid figure by a sneaky technique I like to call "giving my credit card number to Amazon and selecting 2-day shipping" (shhh, no one tell anyone my secret!)


(image shamelessly stolen from amazon.com)

Now that I have the figure I decided I should do something with it (this is where the diorama part comes in).  I looked around my crafting area and saw that I had cleverly purchased two half-spheres of foam.   The classic "round rock chasing Indy through the ancient temple access tunnel" scene immediately came to mind.

I found a screen grab online, and printed it off for reference:


Now I have no idea how to create such a thing as an ancient temple access tunnel.  I have done some minor diorama-ing lately, but that was all clean brick work.  This is gonna be messy, jungly, and old.  Foam and craft paint are not going to cut it here. I'm going to have to create non-square shapes. I'm going to have to create vines, vegetation, and even maybe a cob web or three. However nothing ventured nothing gained, so I am going to throw caution to the wind and see if I can free-wheel a diorama I can use as a set to recreate that scene.

I am not going for movie-realism here.  I mean, it's a kermit the frog dressed as Indiana Jones so how realistic can we reasonably expect to get here?  I am going for a riff off that scene that is both hopefully instantly recognizable, but also my own style and personality. 

I am also not afraid to use Photoshop to polish it off, but this is an exercise in crafting a diorama, so I want to get as much in camera as I can.

I can't stress this enough:  I have no earthly idea what I am doing.  None.  This is me winging it, live on this blog.

Strap in.  It's gonna be a wild ride.

Monday, October 21, 2019

Scavenger Hunt Round 26: Welcome To Oz

These are my entries for the 26th round of the Scavenger Hunt.  It was a bit of an unusual round as I won the last time, and therefore was a judge this round. This means I wasn't eligible for the competition this time around (conflicts of interest and all).  However I was still able to have work in the reveal albums, which is the best part anyway.

These are the images I came up with:

Courage

What else are teddy bears for than to defend us from monsters while we sleep?  Thanks to my daughter for modeling as the sleeping child.
Coward
One of two shots taken at Moses Cone on the Blue Ridge Parkway. Thanks to @harri.hawk for lending me the Jason figure.
Curtain

A lover watching his love shower, or a creepy stalker.  You decide! (for the record I was going for the lover bit)
Home

There ain't no place like home (and by home I mean sewer). I made the sewer grate on the Glowforge at work.
Monkey

Hit-Monkey is a little known Marvel character.  I decided to go back in time to Round 23 to resurrect my comic book cover theme for this one.
Rainbow

Even tough guys have a tender side.
Road

The second shot to come from Moses Cone.  I built the road out of LEGO.  Really fun to make and shoot.
Selective Colour

The tricky thing about words like this is that the picture can be anything. So I decided to find the most interesting action figure I hadn't shot yet and make that my Selective Colour.  This is the awesome samurai themed line of figures from Bandai.
 Sepia

Again, the image could be anything, so its hard to narrow down ideas.  I decided to shoot one of my first figures I got as an adult, Optimus Prime, but have never shot, and put him in an interesting scene. The Very Large Array, often used for SETI also makes a good background for the transformers, who are trying to get back to their home planet.
Wizard

This may be slightly autobiographical.

Tuesday, November 13, 2018

BTS: Hulk v Deadpool


This post was originally  written for toyphotographers.com

Taking a peak behind the scenes is a great way to learn about how other artists get the types of shots they do. To get tips, tricks, and see the madness behind the genius.  That’s the goal of this post: to give you all a peak behind the scenes of how I captured one of my own recent shots, Hulk v Deadpool.

Specifically, this shot:

Behind The Idea

The idea for this shot came to me while I was playing “Strict Parent” for my son, by supervising the cleaning of his room.  While he put away his toys, I picked up his Marvel Legends Iron Man and started posing it (ya know, to pass the time). I eventually put him in a dropkick pose, which I really liked.  I filed the pose  in my fuzzy brain for later use.

“Later” came the next day when my wife needed some ideas for a location to get a shot (non-toy, sadly) of her own.  I recalled a location just up the mountains from our house called Jesse Brown’s Cabin that would be perfect for her needs.  So we made plans to go there the very next day.

Since I now had plans for an awesome location, I flushed out my own concept, and decided it was best served with Deadpool getting the drop(-kick) on Hulk.

Behind the Location

Jesse Brown’s Cabin is located around mile marker 270 on the Blue Ridge Parkway.  It is a field with an old building, a lonely tree, lots of woods nearby, and it is in the mountains, so it’s the perfect place to be.

It looks like this:

When I arrived, and did what I could to help my wife get her shot (my primary goal for the trip), it was time for me to play.  So I grabbed my action figures, scouted the scene, and picked a location. The criteria for location selection was three fold:

  • The perspective made the figures look life size to the cabin, which was about 100ft from the cabin itself.
  • The cabin was at a flattering angle, so it looked good in the frame
  • The sun was behind me, and therefore shining on the figures. (Take advantage of free light when you can get it!)

Behind The Setup

Since the shot is an action shot, I needed to find a way to support Deadpool mid-kick.  To accomplish this I used a technique I learned from FathersFigures at the Toy Safari in Oregon:  14 gauge black solid-core wire.
I got the wire at Lowes and the budget friendly price of $14 for 50ft.  I keep a couple lengths about 6-8 inches long in my camera bag for moments such as this.  For Hulk I pushed the wire into the seam in his upper back, then created a loop at the ground level, so Hulk is leaning back against the wire, which keeps him from falling over.

Note that I could have saved myself some post-processing if I hid Hulks wire behind his leg, but I didn’t notice that until I got home.  An oversight you can hopefully take advantage of!

For Deadpool I slipped the wire behind his utility belt, and jammed the other end into the ground.  It took a bit of maneuvering to get the one wire to hold him where I wanted, but I eventually got it.

Along the way I learned a handy tip.

Behind The Handy Tip

 I added a small loop to the wire tucked under Deadpool’s belt.  This gave a wider surface for him to rest on, and help him stable in mid air.  Without it he would flop around the wire like a rag doll.
Told you it was handy.

Behind The Camera

All that was left to do in the field was point the camera and shoot.  I don’t remember the camera settings, but luckily for you, it is irrelevant anyway (unless you have my exact camera body, lens, and lighting conditions).  The important part is I took the shot from a very low position, and I zoomed in, so the compression effect of the longer focal length ensures the cabin stays an appropriate size in the background.

After that it is just a matter of exposing properly, and clicking the shutter.

Now we’re off to post-processing!

Behind Photoshop
Before we get going, this is where this post gets highly technical.  Not everyone enjoys post processing, and others can’t get enough of it.  So if you are not a post-processor you can just read the titles of the next sections and get an idea of my methodology. If you are a Photoshop junkie like myself, you may get some useful nuggets from reading the text that you can use in your own work.

Either way, however,  for this wire technique to work you will at least have to remove the wires in post-processing.

Behind The Image Cleanup

The first step is to clean up the image to remove those wires, and get ride of unsightly blemishes.

For this I exclusively used the clone stamp and the spot healing brush.  I started by removing the wires from the image. Then I cleaned up some spots on the plastic.  I have gotten into the habit of removing the joints from my figures, so I did that step here as well.  Again, all with the clone stamp and spot healing brushes.

This is what I ended up with:
Note that I also sharpened the image by using a high-pass filter on a new layer, blended with the overlay blend mode.

Behind 90s Pop Culture References

Expression really helps sell the fake of an image.  The Hulk action figure has a generic angry smash face.  Since he was being kicked in the jaw I wanted to give him a more specific expression. So introduced him to a blast from the 1990s, aka Smash Mouth.  To accomplish this I used the Liquify tool to massage his face into a mid-kick-to-the-jaw expression.

A simple touch, but one that gives the shot more realism.  The little details matter.

Behind The Motion

Since Deadpool is in the air mid-dropkick, I wanted to give a subtle sense of movement.  I accomplished this by introducing a motion blur.

I made the blur by selecting Deadpool, and putting that selection on its own layer.  Then I used the Path Blur filter to generate the motion blur effect. Then I dropped the opacity of the blur layer to match the scene.

Behind The Dodging and Burning

Next step was to work on the atmosphere of the scene by doing a little dodging and burning. If you are not familiar with the term it basically means selectively lightening (dodging) and darkening (burning) parts of an image.    I did this to drop the brightness of the background, as well as to add some shadows to the figures (enhance those muscles).

This was accomplished by adding a couple Brightness/Contrast adjustment layers, and using layer masks to apply the darkening to select parts of the scene.  One was to darken the background, and the shadows on Hulk. The other was to add contrast to Hulk and Deadpool.

Behind The Colour Grading

When one is making images one should be true to their vision.  My personal vision and style has muted tones, a desaturated look, and a bit of grit to it.  This step applies the colour grading to get these muted tones. If your style doesn’t match that, feel free to ignore this step, or salt to taste.

This was done using three types of adjustment layers.  First a Color Lookup Table adjustment layer to introduce some orange tones, and lower the blues.  Then a Black and White adjustment layer at 50% opacity to desaturate the images. Finally some Hue/Saturation adjustment layers with layer masks to fine tune some color changes to select parts of Deadpool.

Behind The Finishing Touches

So this brings us to the finishing moves for the image.  First I added a texture layer with overlay blend mode, to add some variations in tones around the scene to give a more dynamic feel to the image.  Finally I added a slight vignette to the edges (blank layer, gradient tool with black to darken the edges, and adjust opacity to taste).

The end result is the image we started this post with:  Hulk v Deadpool:

In Conclusion

So that’s it – my whole process to get from an idea in my head to a finished image.  The image ended up looking as I envisioned, which is a nice bonus.

I hope you were able to get some useful tips out of reading about my process that you can use in your own images.  If you do use any, or have tips of your own, please tell me about them in the comments below.

Cheers!

Monday, July 02, 2018

The Birth Of Thanos (Action Figure Edition)

Warning: Worst animation ever coming your way!

The Marvel Legends series of action figures are really good choices for toy photographers because they are highly articulate and very detailed.  They release them in various series, with the clever marketing ploy of putting a piece of a second action figure in the box - thereby encouraging folks to get the entire series so they collect all the parts for that extra figure.

I decided to dive whole hog into this evil marketing ploy and bought the entire series to get the pieces for Thanos.  Why?  Cause Thanos, man! Thanos!

I decided to put together a GIF of his birth as an action figure, which happened right in front of my eyes, on my wife's quilting desk.

So, worst animation ever of Thanos's birth:

Sunday, June 24, 2018

Scavengers In Asheville: The High Places Of The Blue Ridge Parkway

This weekend I spent in my happy place.  That happy place is hanging out with my tribe of crazy photographers known as the Scavengers.

About 25 of us gathered from all over the US in Asheville North Carolina for a long weekend of trouble and mayhem, photographer style.

On Friday we took a trip up the Blue Ridge Parkway to some of the highest peaks this side of the Mississippi, Mount Mitchell.


I have been up Mount Mitchell many times, but this is the first time it was not socked in with fog.  Being the highest place in a mountain range known for producing a lot of mist and fog, it is often obscured by clouds.  Luckily not this time.

So we spent a bunch of time looking around, and showing the kids which direction our house was... hint - it's over there: --^
 One can drive almost to the very top of Mount Mitchell, so it is an easy place to access.  Our next stop in the Craggy Gardens was more of a hike - 0.7 miles of an uphill climb over rough rocky terrain.
However the view from the top was incredible.
I was surprised the kids made it up well before I did.  I arrived at the summit to find Zeke already waiting for me, at the top of the world.
As is my nature, I grabbed some toys from my pack and started taking photos.   Some strangers started commenting on how cool it was (personal affirmation:  I am cool) and asked to take photos as well.  Spreading the art of Toy Photography one hike at a time!

After we got back to the car we drove back to town for some lunch, and some more urban-based hi-jinx.  That evening I processed one of the photos I took from the hike, and it ended up looking like this.
Not bad for the start of a long weekend, eh?

Wednesday, May 23, 2018

Alternate Realities

With a vivid imagination the imaginary worlds described in books can seem almost real. Be careful what you read, 'cause some imaginary worlds are more real than others.

This is my most recent experimentation with shooting action figures, with a bit of a genre mix to include my self portraiture work as well.
I got the idea for this shot the first time I watched the credits for the totally awesome cinematic event known as Deadpool 2.  The ending credits shows hand drawings of Deadpool interacting with the other characters in interesting ways.  This is how I imagine he'd interact with Yours Truly.

I used my 20" Deadpool figure for this shot, as well as a very temperamental Dave stand in (he's becoming a bit of a diva - it is a bigger problem than you think!). However with some coercion, bribery, and a heavy dollop of Photoshop Magic(tm), I managed to get the shot I wanted.

Maximum effort!

Sunday, May 13, 2018

Deadpool Rocks

This is my latest attempt at shooting action figures.  Deadpool rocking out.

What is notable about this image is that it is the first time I played around with practical effects. 

I wanted to give a smokey effect to add some ambience to the image.  Some smoke effects to go with the rock concert feel.  I started using actual smoke, but my smoke machine, which is perfect for LEGO sized images, wasn't really sufficient for the much larger 20" Deadpool figure.

So I went back to the ol'd standby: water in a spray bottle. 

This is a peak behind the scenes.  Along with the two speedlites at table height to provide side and rear illumination (think stage lights), I also had a speedlite on a stand in front of the figure to fill in the shadows.

I think it turned out pretty good.  I am going to mark this attempt a success.

On to the next image - what shall I do next?  Suggestions welcome.

Wednesday, May 09, 2018

Good Artists Copy...

One of the phrases often used by artists to discuss the creative process is  "good artists copy, great artists steal." On my personal quest to expand my artistic horizons from LEGO to larger action figures, I am still in the process of figuring out techniques and styles.  As a  result I can't honestly say I am great at it - so I decided to go with the copy route.

Recently I obtained a 1/4 scale Deadpool action figure, and have been working on getting some ideas for how to shoot it.  In search of inspiration I went spelunking thru a Google Image search and came across a promo poster from Comic Con for the movie Deadpool 2.

I decided to recreate it.  This is the result:
It is interesting to shoot larger figures. I have been shooting LEGO figures for so long that it is refreshing to be able to treat my subject more like traditional photography - including using studio lights, soft boxes, and backdrops.

Scale is still an issue tho as I had to make due with whatever stuffed animals were in my daughters toy box.  As a result I had to composite in the bear to get the scale at a proper scale (in real life the bear is almost the same size as Deadpool).

Oh, if you are wondering about the original, it looked like this:

So thus ends my second foray into shooting action figures.  I think things are going well, even if I do say so myself.  Don't you agree?

Thursday, May 03, 2018

Where My Bonus Went

You may remember this post about a week ago, in which I got a bonus at work, and spent it in two minutes on an action figure?

Also do you remember I was all coy and didn't say which action figure I bought?

Remember? Pepperidge Farms remembers.

Good news! The action figure finally came in, which means I can finally answer the question that has literally kept us all on the very edge of our seats (work with me here).  So without further ado, if you haven't figured out from the images already, that action figure is...

Deadpool.

The model is a NECA Marvel Classics Deadpool 1/4 Scale Action Figure.  It stands 20" tall, which is about 15x taller than a minifig.  He has an incredible amount of detail, comes with several weapons and hand poses.  Deadpool also has a decent amount of articulation so it should be fairly decent for posing.

In other words, it should make a good model to start expanding beyond LEGO.

I also picked up a couple comics to act as inspiration.

It should be interesting to shoot this model of Deadpool as the scale and poseablilty is much larger than the LEGO I am used to.  I am up for the challenge. Maximum effort!

So that is where my bonus went... stay tuned for more images of the Merc With A Mouth, Deadpool.
Pass the chimichangas!

Friday, April 27, 2018

I Got A Bonus... And It's Gone

This is an actual conversation I had with my wife via chat from work yesterday:

Me:  Hey, good news! I got a bonus at work today!
Wifey:  Ooh, for what?
Me:  I did some grungy work and was recognized for it.

~ 2 minute pause ~

Me:  I just spent it.
Wifey:  ?!? That was fast!
Wifey:  Spent it on what?
Me:  Action figures!
Wifey: LOL

In my defense the email that informed me of the bonus also mentioned that people get more enjoyment out of such things if they spend in on a special meal, or getting something one normally wouldn't buy for themselves. Challenge accepted.

So now I have an awesome action figure coming my way, all to support my toy photography habit.  True story.  Don't blame me, blame psychology.

If such news of action figure acquisition by Yours Truly alarms you and are wondering if I am going to stop shooting LEGO, fear not.  I have some large LEGO projects still in the works, and don't plan on stopping any time soon.  I'm just branching out into new areas of awesomeness and joy.

Oh, in case you were wondering which action figure I bought...its a surprise. No Spoilers!
No Spoilers!
(Not my photo, stolen from free download site here).