Showing posts with label Technology. Show all posts

Sunday, February 21, 2016

Fun with Extension Tubes

Frequent readers of this blog (hey you!) will know that I tend to make a lot of photos using Lego minifigs.

(If you are not a frequent reader, first of all welcome to the blog, and secondly, you may be interested in knowing that I tend to make a lot of photos using Lego minifigs).

One of the largest challenges with such photography is that the minifigs are much smaller in real life than they appear on the screen.  Really, this means that they require macro photography.  

The problem is this: I do not have macro lenses on my camera.  Macro lenses are also pretty dang expensive and specialized things.

The lenses I have cannot focus on things up close.  My short lens (16-50mm) cannot focus on anything closer than 10" to the lens, and my telephoto lens (55-210mm) has a minimum focus distance of 3.28 feet (yep you read that right - a whole metre). 

Normal portrait photography looks better when taken from a longer lens - 70-200mm lenses are often used by the pros for portrait photos.  Since minifig shots are often really just portrait shots, this means I'd need to have my camera 3.5ft away from my subject to get the look I wanted - 3.5ft to capture something that is 1.5 inches tall.  As you can imagine, since I shoot in a small home office space, that this inherently offers lots of challenges for getting decent shots.

The cheap solution to this is something called extension tubes, which are adaptors that sit between the camera and the lens, and allow the lens to focus much closer to the subject.  I recently bought a set of tubes (Neewer 10mm and 16mm tubes), and today I gave them a try for the first time.  

The following are the results of some test shots with and without the tubes.  My goal was simply to get the minifig the largest size in the frame with each configuration (i.e. I didn't worry about lighting, or an interesting scene - just macro-ness).  The resulting shot of each lens with and without the extension tube side by side for comparison sake.

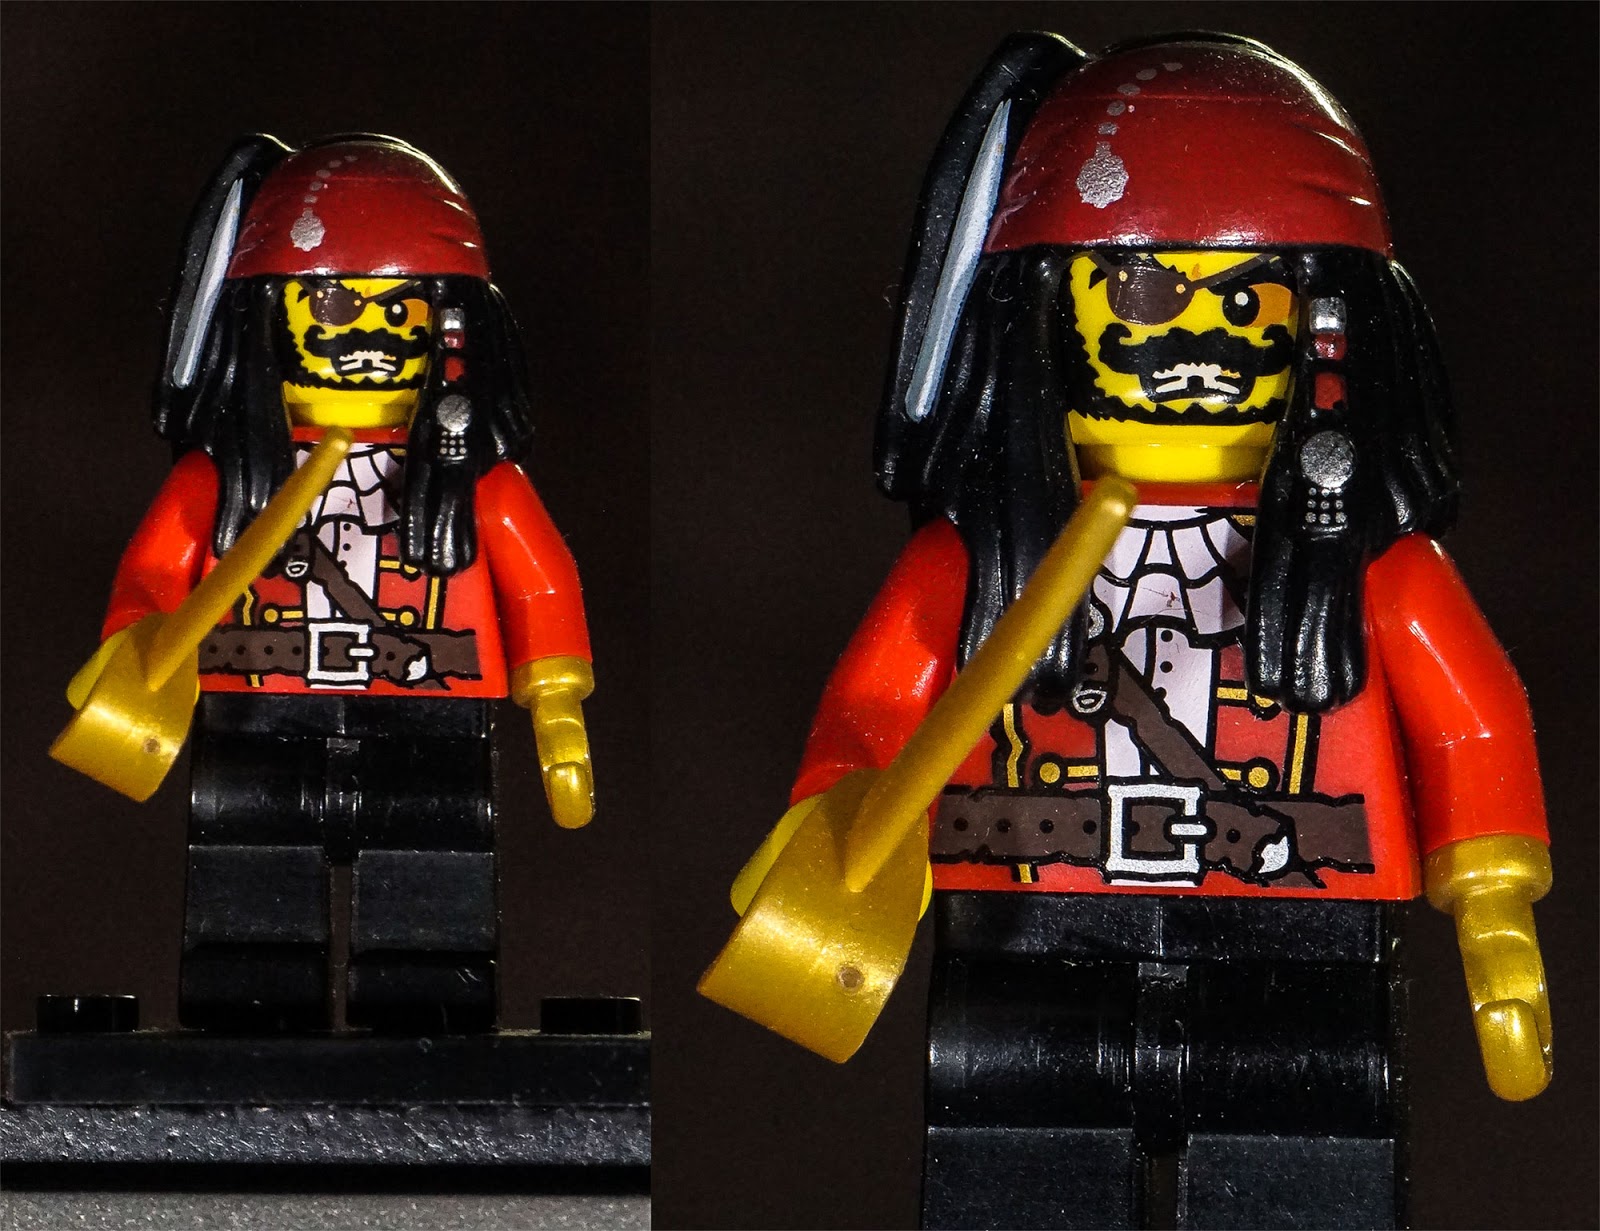
The first is taken with my telephoto lens.  The shot on the left was taken racked-out (full zoom) at 210mm, and my camera was 3.5ft from the subject.  The second, with both tubes in place, was 10 inches from the subject, taken at 107mm, and the minifig is much larger.  This gives me better results, and the camera is in a much more workable position in my studio.
The second test was with my short lens.  The non-tube version taken at 45mm zoon, and the lens was about 10 inches from the subject. The tube'd version being 6 inches away, and 50mm zoom.  This is a more dramatic difference.

As you can see I can get much closer with the extension tubes, which is going to help on so many levels.  Now all I need is an idea for a decent shot and I can give these tubes a real workout.

Wednesday, February 11, 2015

The Red Menace

Fun Fact:

Your GPS device will stop working if it goes above 1200MPH, or gets above 60,000ft.

Why?  Because of the Red Menace.  When the GPS system was designed, this limitation was put in place to ensure that the GPS devices would not fall into the hands of the Soviet Union and its allies and end up in control of Intercontinental Ballistic Missiles aimed at the US.

This means you really can't, despite what you may have heard, geocache on the International Space Station. (Don't blame me... blame Stalin.)

Just one more reason why communism is a bad idea.

Makes me wonder if the same is true about GLONASS.

Sunday, September 07, 2014

My Lil'Quadcopter

I have been wanting to play with quadcopters for a long time (before they were cool - almost like I was chanelling my inner hipster).   A month or so ago it was reccomended that I start small, so I bought a $75 Hubsan X4 H107C.

The quadcopter is small, about the size of my hand, and fairly rugged, so it makes a good starter kit.  It also comes with a 2MP HD video camera, which takes decent movies.

I have about an hours worth of flight time in at this point, and I've managed to fly it for several minutes before crashing it to the ground like some sort of disaster film.

One issue I am having is that when the quadcopter turns, it seems to also gain altitude, so I have to adjust the throttle, which sometimes causes it to plummet to the ground, so bouncing it off the lawn has become sort of a past time with me.

I have a video of some of my first attempts at flight, followed by some action shots.  Very exciting.


Note at the end I was able to land the drone in my hand.  Not bad for an hours practice, eh?

I have found launching from my hand works best, as well.  


Don't let the small size fool you - this thing can move.  It doesn't take long for it to whisk its way across my back yard, and get lost in the grass. At times the kids have functioned as a search and rescue crew (handy, that).
It also takes a disturbingly short period of time to get really high up.  Being so small, I have lost it a couple times in the sun.  I've also bounced it off the roof. Fortunately it landed on the driveway at the front of the house. (Disturbingly I was in the backyard at the time).
This is promising to become a lot of fun.  

It doesn't have a name yet tho.  I am thinking of calling it 'Mosquito', cause its small, and makes a whiny drone when the blades are spinning.  What do you think?  Suggestions welcome.

Wednesday, August 06, 2014

Virtual Reality On A Budget

In what is possibly the coolest merging of low tech and high tech, one can now get a very passable virtual reality headset for your Android phone, for approximately $10.

Best part: it is made out of cardboard, with two simple lenses, and a magnet.

It sounds like something an 8 year old would build, but it was actually designed by Google engineers, and it actually works as advertised. Almost like magic.

It is called Google Cardboard, and is basically a cardboard box that holds your phone in front of your eyes in just the right way to allow for a 3D effect.  It then uses your phone display and sensors to show you 3D images that respond to your movements.

To use it you need to download the Cardboard app (free from the Play Store), which has several demos included, such as (among others):  YouTube, Street View, PhotoSphere viewer, and a Google Earth Viewer.

The amazing thing is that it works fantastically well (especially considering it is made from the stuff most other things are shipped in).  I tried out the Google Earth viewer, and you can navigate the world in 3D simply by moving your head around.  This is pretty much what you would expect from any VR headset - but the effect is astoundingly effective.  The resolution is a tad lower than a normal Android display because you are splitting the equivalent of an HD display, however, half an HD display is still a lot of pixels to play with.

Icing on the cake is that it works while wearing glasses, so there are no focus issues for us weak-sighted folk.

It works by splitting the phones display into two halves with the correct parallax distortion between the two to simulate 3D.  You can see how it looks in the screenshot below (looking at the Chicago skyline in the Google Earth demo).

So far the only downside I can see is that it eats your cell phone battery like a fat man at a Chinese buffet, so you'll want to keep your charger handy.

It is impossible to show you what the experience looks like, so you'll have to simply go check it out for yourself.  For $10 it is quite possibly the cheapest entertainment going so you have little to lose. You won't regret it (just make sure you have a compatible Android phone - only a few models are proven to work so far).

You can check out the details for yourself here: https://developers.google.com/cardboard/, and either build your own viewer, or buy one off Amazon.

Tech is finally mind blowing again, and it is awesome.

Disclaimer: As a Google employee I try to stay away from mentioning Google products on this blog - partly to avoid any conflict of interest issues, and partly because this isn't really a tech blog. All opinions are my own, and may not represent Google Inc's stance etc. Aside from sharing a CEO, I have no contact or connection with the folks that built this technology. I didn't really knew it existed until a Cardboard set was handed to me this morning. I am, however, a freshly minted fanboy of the whole idea of VR on the cheap.

Sunday, March 23, 2014

Garmin Monterra Review Part 6: Conclusions


To wrap this review up, lets summarize some of the strengths and weaknesses of the Garmin Monterra.

Strengths
  • Relatively new Android OS
  • Android side of things works great
  • Workable display
  • Power pack should save a lot of money on batteries
  • GPS and GLONASS provide excellent accuracy
  • Comes with international power adaptors and screen protectors
  • Supports a virtual unlimited number of caches
Weaknesses
  • Still have to reboot device for Garmin apps to see new maps and GPX files
  • Large physical size
  • Burns through power like a congressman burns through cash.
  • Some subtle yet incredibly annoying UI apps on the Garmin legacy side.
  • Expensive
Conclusion

Going into this review, and given the revolutionary aspects of the Monterra, I expected this device to be weak in some areas, and stronger in others.  What I didn't expect is that these areas were completely opposite.  The Android side turned out to be stellar, and the legacy Garmin side turned out to disappoint.

Despite how shiny and new this device is, and how convenient the Android OS makes the device to use, its downsides far outweighs its upsides.

At one stage during testing I had the Monterra, the Montana, and the eTrex, all ready to go in my pack, and honestly, every time I reached for a GPSr to search for a cache, my instinct was to pick the eTrex.

The Monterra is pretty, but I'd rather keep my current setup, all things considered.


Did I miss anything you wanted to see in the review? Drop me a line in the comments and I'll address it inline, or in a follow up post.

<<  Previous section: Power    |    Wrap around to the Introduction ^^

Garmin Monterra Review Part 5: Power

We come at last to the issue of power.  Battery life is one of the most important issues that a geocacher faces when going out in the field.

This is where the Monterra falls flat on its face.

I canna do it, Captain!

I have yet to see a GPSr from Garmin that will not last at least a full days usage in the field.  I have geocached for 12 hours straight with my Montana 600, a device which uses the same size power pack as the Monterra, with power at the end of the day to spare.

The Monterra gets nothing close to this.  The first time I took out the Monterra on a caching run I got just under five hours from it.  Five.  Take a moment to ponder that. This isn't barely a solid mornings worth of caching, let alone an entire day.  In Garmins defence, I did take the device straight from the charger, and did not do any of the normal power saving things one can do on such devices, like lower the display brightness, or turn off the radios.

I decided to give it a second, more fair, attempt, and gave it every chance I could:  Full charge overnight.  Turned off all radios except the GPSr, turned the backlight down to 0%. I shut down all Android apps, and only used the ones provided by Garmin.

I turned the GPSr on in the park I was caching in for the day, and cached for 3 hours, 25 minutes.  I found 12 caches.  When I was done the battery was at 45%.  To compare this to a device I know has great battery life, I brought along my Montana and let it run the entire time I was caching, with as equal usage as I could give it.  It was at 85% battery life by the end.

I hope you can see the problem here.

One handy feature of Android devices is that they give pretty decent stats about where the power goes.  As you can see it went mostly (64%) to Garmin Outdoor Apps. Luckily this looks like a software problem and could theoretically be fixed in an update.  However until then, stock up on batteries.  It takes 3 AAs each, and if they last the same length of time as they did in my Montana, you'll get about 3 hours from the set (I typically got 2/3rds of a runtime from AAs on the Montana as I did from the battery pack)

Charging Time

Garmin seems to also have issues with charging. For some reason the Monterra just burns power.  It can take 4-5 hours to get fully charged from the provided wall plug.  In contrast my smart phone takes about 2 hours.

The Monterra seems to have trouble getting charged from a computers USB port while its turned on. My phone charges just fine, albeit twice a slow.  I think Garmin needs to rework their power systems.

Note: I feel comparing the charge times between the Monterra and a Nexus 4 is a fair comparison. Both have roughly the same size batteries, do roughly the same things on the same general OS, and both charge via USB. If anything the smart phone should fair worse as it has a larger battery to charge, more radios, larger display, and faster processor, all of which should burn more energy.

Hopefully these power issues are a software issue and can be fixed in the future.  As it stands now the Monterra falls well short of acceptable power usage for the hard core geocacher.

<<  Previous section: Legacy Garmin Software    |    Next section: Conclusion >>

Garmin Monterra Review Part 4: Garmin Legacy Software

Let me start off by saying that, in general, I have been quite pleased with the software that Garmin puts on their GPSr devices.  I have very few complaints with how my personal GPSr devices work, and all of them are minor.

Going into this review of the Monterra I suspected that the Garmin side of things would remain as useful as it always has.  There did turn out to be a few problems.

UI Issues And Schisms

I ran into some serious user interface issues that nearly caused me to pull my hair out, for it is amazingly annoying.  The issue comes down to changes in how the geocache dashboard works.

On other Garmin GPSrs that I have used (namely the Montana 600) during navigation to a geocache I am presented with a map. On top of that map is a dashboard that has basic information: cache name, direction, distance etc.  When one touches the dashboard one is presented with details about that cache. Simple interface, and exactly the result I expect.

On the Monterra the navigation is, essentially, the same setup. Map screen with a dashboard on the top showing cache name, direction and distance.  However when one touches the dashboard one gets presented with a list of caches, sorted by distance.  This means that I have to then select the cache I want again before I can view its details. I already selected it once, which is the reason why the dashboard is navigating to it, so this extra step really grinds my gears.  It is made doubly annoying if the cache is not the closest cache as one has to scroll the list to find the cache first, they touch the entry to get the details.  Every time this happens I keep mentally screaming "Just show me the bloody cache!"

Update(2014-03-29): Apparently the above issue has been fixed in the latest Garmin Outdoor Apps update, 1.18.  Click here to get details on updating.  This does bring up a question tho:  Why the crazy update scheme, Garmin?  In a world that already has an app store, why force users to side-load your APK?

There is a third annoyance in that selecting caches from the list seems to require an extra hard touch, which doesn't happen at any other time.  Not sure if the Garmin engineers intended this bizarre behaviour, but its definitely a bug, and an annoying one at that.  This all may seem minor, but since selecting caches and viewing their descriptions is 50% of what I do with a GPSr, this is a serious black eye on the device.

Legacy Vs New

Another issue is more a result of the cross between the way Garmin traditionally loads data onto the device and the new modern world.

In an Android world, if an app wants to use a compass, it can provide its own, or use a signal called an intent to prompt the use of any other compass or compass like apps that may be installed on the device. This way a user can pick and choose which compass or map they prefer, and use it for most things.

I sort of expected this same function sharing from Garmins software as well. However I could not find a way for Android geocaching apps to be able to share Maps or cache listings.  I am not sure if this is a true limitation of Garmins software, or simply that the Android apps are not set up to share such data, but if any Garmin engineers read this: Making your compass and maps apps shared via an intent would be awesome.

This also means that if one wants custom maps one has to load them multiple times. Once for the Garmin side, and another for whatever Android device is being used.  This rapidly takes up space. Hardly ideal.

Data Loading

Loading data (GPX or custom map data) is also different, but not necessarily in a bad way, and it is Androids fault.  When plugged into a computer via USB, most other modern Garmin GPSrs mount their drives as USB drives, and data can simply be copied back and forth as it can on any other drive on the computer.  Since Android does not allow its drives to be mounted in this way, one has the additional step of having to install an app called Android File Transfer to copy data directly to/from the GPSr. Android File Transfer is free, and available here.  Use of Android File Transfer is standard fair for Android, so it shouldn't really come as a surprise, except that it now applies to your GPSr as well.

Of course one can simply use a program like Dropbox to copy data onto the device.  The Monterra still expects the data used by its apps to be under the /Garmin directory so one can simply save GPX or map files there and the GPSr will make use of them.  Bizarrely tho, it still requires the device be rebooted before the Garmin apps will see the new data.

Garmin Desktop Apps

Both MapInstall and BaseCamp seemed to work with the Monterra. I actually used MapInstall to put a set of OpenStreetMaps onto the device for testing purposes.  The one catch I had was that Android File Transfer started up as soon as I plugged in the Monterra to my computer, which caused the Garmin apps to not see the device.  The solution is to simply close Android File Transfer before using the Garmin apps, but it is one more thing that gets in the way, and may not be intuitive for the new user.  These problems were seen on an iMac, so Windows users may get different results.  Just something to watch out for.

<<  Previous section: Android    |    Next section: Power >>

Garmin Monterra Review Part 3: Android

So far this has been a typical Garmin GPS.  So lets get down to why it is special: Android.

I know many geocachers have had reservations about such a GPSr/android device.  The two biggest concerns are about being stuck on an old version of Android so their apps will not work, and the other being that the screen is not large enough.

Lets address these issues head on.

Android

The version of Android on the device is Ice Cream Sandwich (4.04).  While not the newest version (which is 4.4 Kit Kat), it is still quite modern.

Using Android on the Monterra feels just like getting any new Android device.  I was first prompted for my Google account information, and asked to set up the wifi connection.  It then logged me in to a fully functioning Android experience.  I even started getting new email notifications right away (an unexpected and surreal experience to do a Hangout on a GPSr).

I promptly started installing my favourite geocaching apps: CacheSense, Locus Pro, GCC, Groundspeak's Geocaching App etc.  All of them worked flawlessly.  There were a few minor issues with performance, for example Locus Pro took twice a long (60 seconds instead of 30 seconds) to process a 1000 cache GPX file, but in general the performance was not an issue.

You have full access to the Google Play Store, and the Monterra shows up as a device on the store so you can simply push apps to the device from the website.  Rather handy.

If you don't have any apps you want to use, the device does come preloaded with some apps.  All of the typical Garmin functionality is implemented as Android apps pre-installed on the device, for example.  The Settings app looks like typical Android as well, aside from a few additional menu options to configure features not normally found on phones (such as turning on WAAS, or selecting GPS/GLONASS options).

In fact Android works so well on the device I forgot I was using a GSPr at all. Except for the display and larger physical size, it felt like I was using my smart phone.

This conveniently segues us to the display, so lets tackle that now.

Display

So the display resolution is rather paltry sounding.  At 272x480 pixels it pales in comparison to the typical modern Android device. For example my Nexus 4 has a resolution of 1280x768.  So one would be understandably skeptical about how useful Android is on such a low-res screen.  One would, however, be completely wrong.

Now I am not going to sit here and tell you that the screen is amazing in all respects.  I would never want to watch a movie on it, for example.  However it is quite adequate for its needs.

I took side-by-side screen shots of Locus Pro so you can compare the difference between a modern smart phone display and the Monterra:

As you can see, the screen is quite adequate for all of its limitations. The Monterra is not as crisp as the Nexus 4, but most folks would not have any issues using those maps.

Some of the menus and buttons end up in different spots on the screen, but with a very small amount of exploration I had no problems getting used to how my favourite apps worked on the Monterra.

The display also looks great in the sun, and I had no problems reading it, even in direct sunlight, and with the backlight turned completely off.

I was completely blown away by how polished and usable the Android experience is on this device. I was about to declare the Monterra one of the best GPSr's I have ever used.  I was ready to toss away my old setup of using an eTrex 30 and a Nexus 7.  That would prove to be a premature conclusion however, as there are some critical problems with the device, and they are where I least expected them.

<<  Previous section: Technical Specs    |    Next section: Legacy Garmin Software >>

Garmin Monterra Review Part 2: Technical Specs

Whats In The Box?

The Garmin Monterra comes with the following things:
  • GPS unit
  • Manuals
  • USB power supply
  • USB cable
  • Lithium-ion battery pack
  • International power adaptors
  • Screen protectors
It is a list comprised of exactly what you would expect, except the screen protectors are a nice touch.   It would have been nice if they had included some sort of strap, however.  The first thing I did when I pulled the unit out of the box is attach a small lanyard for carrying purposes.

Technical Specs

The full list of technical specifications are on the Garmin website (listed here) so I won't bother repeating all of the specs here, but I will list the salient details for convenience:
Size difference compared to a standard
pack of playing cards.
  • 4" touchscreen,  272x480 pixel resolution
  • Weight: up to 13.2oz depending on batteries used.
  • Power: 3AAs, or the 2000mAh lithium-ion battery pack
  • Supports custom maps
  • 6GB memory with the base maps, 3GB with topo maps.  
  • microSD card for additional map storage. (microSD card not included)
  • Can hold an unlimited (where unlimited is the limitations of the devices memory) amount of caches.
  • 8 megapixel camera.
  • Wifi enabled.
  • GPS and GLONAS enabled.
It is important to note that this device is huge for a GPSr. It is the largest handheld GPSr I have ever seen.  I added a size comparison photo to a deck of cards to get an idea of how big it is.  I still find, however, that it would get lost in a pack or pocket, so it is definitely manageable.

Touchscreen

The touchscreen is resistive, which means it works in the rain, and with gloves on.  For the most part the screen is quite responsive. There are some exceptions, for example the Geocache List window requires an extra hard press to get it to recognize a touch.  I have no idea why this is as other touches to the same part of the screen in other modes have no issues. 

In general if you have used any Garmin touchscreens, this one acts exactly the same.  

Camera

This seems as good a time as any to discuss the camera.  It is an 8MP camera, which is quite decent.  It does  not have any optical zoom, so its all digital, which vastly reduces quality when zoomed.  If you look at the camera as being a typical smart phone camera you have the right idea.  It is great for taking those quick in-the-field-memory shots, or photos of information for multi-caches or virtuals.  However if you don't consider your smart phone camera to be sufficient for your photography needs, you will find the same here.  Photographers will still need to being a proper camera into the field to get awesome shots. However, as I mentioned, it is more than adequate for those impromptu photos.

Accuracy

In comparisons with my other GPSrs (Garmin eTrex 30, Garmin Montana 600) I didn't really find any differences in GPSr accuracy.  This shouldn't be surprising since I haven't seen significant changes to this in quite some time. The GLONASS support will help in the future when the Russians fly some more satellites, so things will hopefully get better than they are now.  However now is looking pretty good as it is.

<<  Previous section: Introduction    |    Next section: Android >>


Garmin Monterra Review Part 1: Introduction

There is literally nothing more fundamental to geocaching than a GPS receiver.  There is also few things as much fun as exploring new tech, and the Garmin Monterra promises to be a revolutionary step in the development of GPSr units for the geocacher. As you can imagine that when I was offered the chance to review the Garmin Monterra GPS first hand, I jumped at it.

The following is my review.

Before we continue...

Now, a couple notes before I get into the meat of things.  Blogger, the system this site uses, works awesome for the smaller posts that I normally do, but it is not so awesome for longer ones.  As a result I am going to put my review in a series of posts released all at once, and linked all together.  Hopefully this will end up feeling like a unified review.

Second note:  I have never done a product review before, so its likely I may have missed something.  Please feel free to drop missing bits in the comments and I will do my best to get them addressed.

Note The Third:  I am an avid geocacher, and this review is geocaching specific.  This unit could be used for a great many other things, but those use cases will remain theoretical.  I am also assuming my readers are geocachers.  If you are not a geocacher and something isn't clear as a result, please feel free to drop a comment and I'll clarify things for you.

Fourth Note:  I am using a Garmin Montana as a comparison device to the Monterra in a couple areas.  The reason is two fold:  I've used the Montana to find over 1200 geocaches and am very familiar with how it functions in the field.  It is also a very recent model so there is not a lot (in theory at least) changes in the hardware.  I also compare it to the Garmin eTrex 30 as it is my primary caching device.

Whats the big deal anyway?

First question has got to be: why do we care?  What is the big deal about the Monterra anyway?  The Monterra is the first GPSr from Garmin (perhaps from anyone) that is based on Android.   Many geocachers have stated that the one thing they wanted in geocaching technology is the ruggedness and battery usage of a stand alone GPSr merged with the flexibility and functionality of a smart phone.  The Monterra promises this exact holy grail combination to a geocacher.

This device is expensive, at $650 USD for the base model ($700 with topo maps), so it has big shoes to fill.

The burning question is: does it live up to its promise?

You can find the rest of the review on these posts:
So on to the next section: Technical Specs >>

Monday, January 13, 2014

Nexus 7 Based Geocaching Kit

Update:  Since writing this, Chrome has become much more usable, so you can use Chrome for up/downloads if you wish.

From time to time I am asked by, literally no one, about what gear I use when I go on extended geocaching trips.  In response I am listing a new setup I have for handling my geocaching road trip tech needs.  Note that this post assumes a certain level of technical knowledge, so if the phrase "USB host port" makes your eyes gloss over, you may want to skip this post.

Everyones preferred caching tech differs. Some are happy using cell phones; as for me and my house, I use a GPSr (Garmin eTrex 30) for my main caching.  I often bring along a laptop (MacBook Air) to do cache trip planning.  Normally the laptop stays in the van but occasionally it comes with me into the field (especially when in areas where car break-ins are common).  Although this gives me everything I need in the field for pretty much any geocaching related tech need, it has some drawbacks (heavy, short battery life on the laptop, and not super field rugged, not to mention very expensive).

I have finally come up with a good solution for my geocaching tech needs using a Nexus 7 tablet, and some handy apps. This allows me to leave the heavy laptop and home and bring the much smaller and cheaper tablet into the field (not to mention the battery life is 4x that of the laptop, and it has a GPS built in).

My needs for my in-field computer are as follows:  Generate PQs from geocaching.com, download PQs to the GPSr, upload field notes from the GPSr to geocaching.com, and display PQs and offline maps in an app that doesn't make me go all stabby.  The Nexus 7 running Android 4.4 (KitKat) has certain design and use-case assumptions that are (not to be overly harsh) idiotic.  As a result it supports almost none of the features I require out of the box.  However with the right applications, and a special USB cable, I was able to make it all work.

Here is the low-down on my new geocaching kit:

Accessing Pocket Queries

My preferred Android browser is the stock Chrome browser that comes with the device. It works great for accessing geocaching.com, but completely drops the ball when it comes to the ability to upload or download files (it can download files, but it puts them in a random spot on the drive, which makes it hard to access later - not exactly helpful).  So I use Firefox for downloading PQs, and ES File Explorer for unzipping those files and saving them to a known folder on the local device.

Copying Files To/From GPSr

The Nexus 7 cannot access USB drives natively, and it doesn't have a USB host port.  I work around this by using an OTG cable to connect my GPSr to the tablet.  I use the Nexus Media Importer app to copy files to/from the GPSr to the tablets local filesystem. This works very well, and doesn't require rooting the Nexus 7, like some other options require.  This setup allows me to copy GPX files to the GPSr, and copy the field notes file from the GPSr to the local filesystem.

Uploading Field Notes:

Another design decision employed by Android is the lack of a native file manager (more raving lunacy!), which seems to cause Chrome to utterly fail at uploading files to websites.  Firefox, however, has its own file manager built in (brilliant!), so it can upload files with ease.  So I use this to upload field notes from the Nexus 7 filesystem to geocaching.com.

Geocaching App

I was using Cache Sense for an app.  It works well, except its management of offline maps is poor - it can take days to download larger sets of maps, and once it does, one has zero control over them.  I tried some other apps which all had issues of one kind or another.  Then I discovered Locus Pro, and its geocaching plugin, geocaching4locus and my world became a brighter, happier place (truth me told, this app was actually the thing that prompted me to think that a tablet may actually work as an Android based geocaching device that wasn't full of fail and hate - turns out I was right).

Locus Pro is, hands down, the best geocaching app I have ever used, probably because its primary purpose is not geocaching, but rather a feature filled map app.  All the geocaching stuff was added in later.  It has all the expected features of a geocaching app (displays cache descriptions, loads PQs, uses the geocaching.com API for live queries and logging etc.). It also has an amazing offline maps management system. It takes a fraction of the time other apps took to download maps, and once downloaded you have complete control over the files. You can load and unload maps at will, and the response is blazing fast (for a tablet).  This is easily the best money I ever spent on an app ($10 may seem expensive, but its the same price as the Groundspeak official app, but 100x better). There is also a free version, but I don't know if it does everything.  I paid the cash to support the developer).  It is the unheralded king of geocaching apps.

So that is my new kit.  It has worked for me for several trips in the field so far.  It has all the advantages of the old laptop based setup (plus some extras) with none of the downsides, and it fits easily in my pack (or pocket, or hand).  I did have to drop a few bucks for the apps, but it is well worth it, and it was still less than a years membership at geocaching.com. Well worth it for a rig that should keep me geocaching in style for years to come.

Bring on the arboreal occluded tupperware!

Note: if anyone has any questions about how to set up their own rig like this one, drop me a line and I'll do my best to help out.

Tuesday, February 15, 2011

Jeopardy: The IBM Challenge

This is fascinating stuff... IBMs attempt at making an artificial Jeopardy Champ.

Part 1:


Part 2: