Friday, October 23, 2020

Photography Scavenger Hunt Round 29: Round

 The 29th round of the Photography Scavenger Hunt brought some interesting limitations:  no Photoshop.  None.  Every image must be straight out of camera.  For someone as Photoshop heavy as me that presented some interesting challenges.  It meant I had to build my worlds in real life, instead of in Photoshop.


This is how I built the world for the word "round."

The concept was the knights of the round table.  As I remember the story, all the knights at the round table would place their swords on the table, facing in, as a sign of... whatever the sign was - I am not a knight - I don't even play one on the Internet.  At first I envisioned a simple scene of a wooden table with swords facing inwards.  I then expanded it to show a kingly figure at the far end of the table.  

When I went looking for sword props online I soon realized that the only good looking miniature swords were from Game of Thrones.  I bought a bunch of those.  It did trigger the thought of mixing the King Arthur legend with Game Of Thrones, and having the round table be in front of the Iron Throne.  

Of course, being me, Deadpool would be the king, and while all the other swords were medieval ones, his swords would be his classic katanas (fun fact, they are named Bea and Arthur).

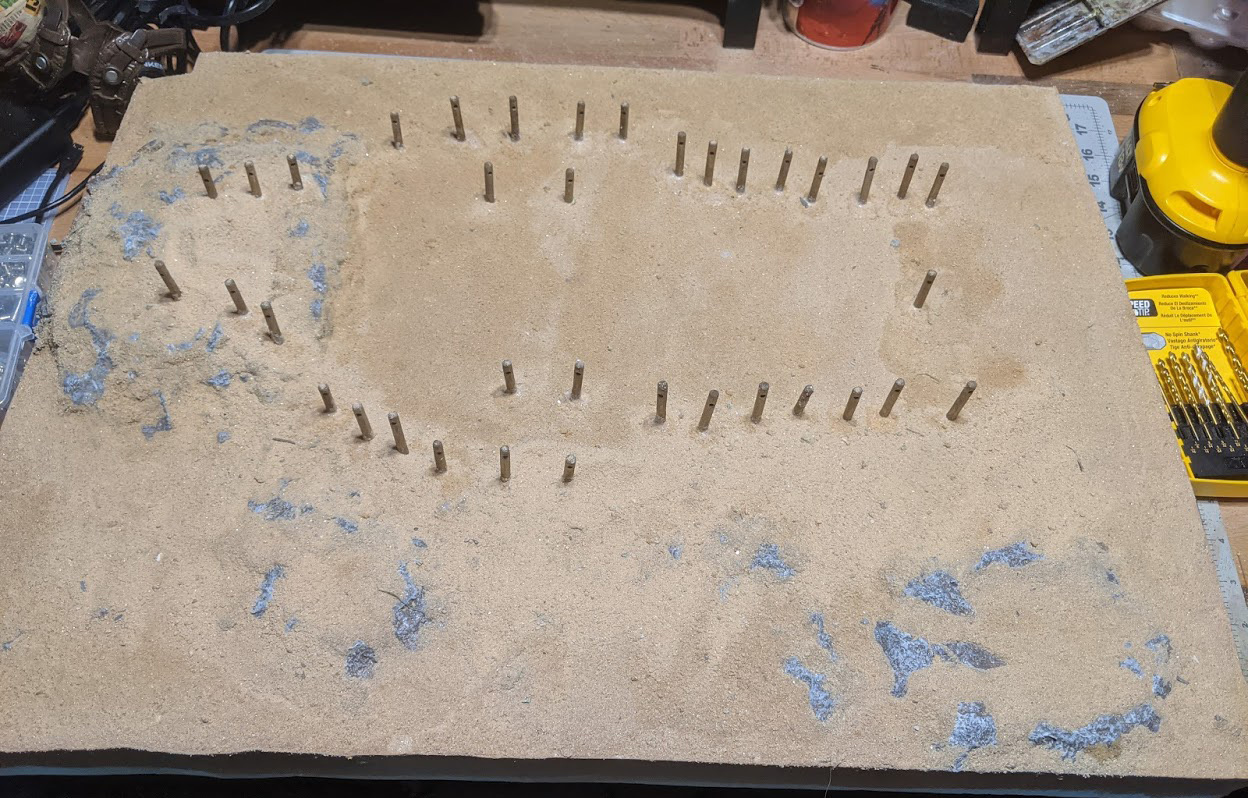
I set about building a round table out of XPS foam (my diorama weapon of choice).  I needed a rather large table - about 18" to accommodate the swords, which are themselves about 8" long.  Making circles is hard, so I had to improvise a jig to get something close to a circle (it ended up working well, over all).

Once I had the table built, I needed to kingify Deadpool.  I started by making a crown, based off of King Joffery's crown from Game of Thrones, out of cereal box cardboard (Shreddies, if you must know) and some metallic paint.
I then raided (by raided I mean asked nicely, and was given) my wife's stash of fabric for some faux-fur to make a kingly robe. I didn't have to worry about everything, as the shoulders is all that would be in the shot. This is what I managed to create.  For scale, the Deadpool figure is 12" tall:

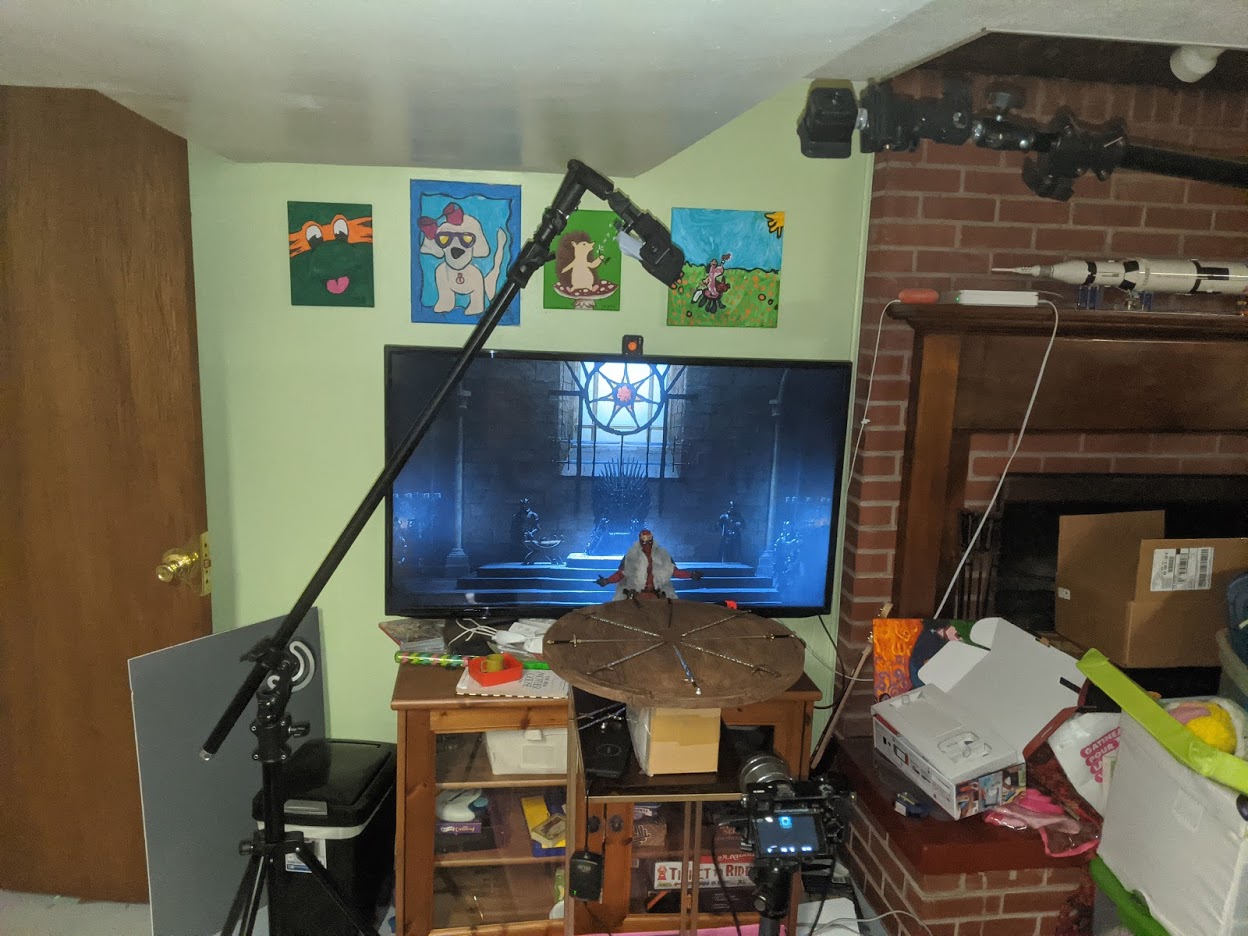
The it was a simple matter of setting up the scene in front of my TV, and having it display a screenshot from the show showing the throne room.  I set up some lights on stands over the models.  I also tossed a Lume Cube on the top of the TV to add some back light.  

The light placed on the TV provided some interesting properties in that it caused flaring on the lens that looked like sun rays.  I decided that this was a happy accident and kept them for the final shot, composing things so the rays looks like they were coming through the window.  This is the straight out of camera shot I submitted to the hunt:

I was pleased with how this came out, but I knew some Photoshop magic would really bring this image to life, so as is my custom this hunt, once I submitted the SOOC image, I processed it further to give the image my own personal touch and style.  This is the final result:

Interesting fact, the first concept I had was an android holding the moon. However I had no idea how to create that in the real world with the tools and time available to me.  I did create that shot using Photoshop tho. It looks like this:


Thursday, October 22, 2020

Photography Scavenger Hunt Round 29: Boats

 The 29th round of the Photography Scavenger Hunt brought some interesting limitations:  no Photoshop.  None.  Every image must be straight out of camera.  For someone as Photoshop heavy as me that presented some interesting challenges.  It meant I had to build my worlds in real life, instead of in Photoshop.


This is how I built the world for the word "boats."

The concept for this changed over the course of the hunt.  At first I wanted to do a boat being paddled by a skeleton, escaping a damaged pirate ship (ya know, as skeletons do).  But I realized the logistics of making that shot happen all in camera was way to much for what I was willing to do.

I even made a boat to use out of XPS foam:
I even carved paddles out of gigantic popsicle sticks:

When it came time to shoot I realized I'd need a body of water, and I didn't really have a good one handy.  I do have a blow-up pool, but using that would put my camera at risk from water damage - plus by the time I got around to being ready for shooting the weather was getting colder, so being in a pool at night (my shot was a night shot) was not appealing.

I decided to scrap the concept completely and shift it to a shipwreck scene.  There are many real world examples of shipwrecks being entirely on land, so I didn't have to mess with real water.

I had already purchased a cheap pirate ship model for the original concept that I could reuse.  I just needed a scale beach for it to wreck on.  Enter XPS foam!

I started by making the base of the scene.  I wanted the ship to be washed into a sandy hill, so I built up some terrain with foam.  I imagined the ship wrecking as it went into an inlet, so I added some land on the far side.

For the water itself I needed an indentation in the foam. To get that I used a property of spray paint that is normally annoying with foam:  the propellant melts XPS foam.  This sucks if you accidentally melt your finished product, but it also can be used to make interesting patterns in the foam that is perfect for the bottom of a river. 

I used clear coat to spray the foam in strategic locations to get an inlet type water structure going.

Then I grabbed some scraps to rough out some landscapes.  I wanted the ship to be washed against a pile  of sand.  I would use actual sand later, but I needed an underlying structure for that pile. Hence the square foam blocks.


Then I covered everything in Sculptamold (paper based modeling putty, basically).  This allowed me to turn the rough square landscape into something more natural. I did leave a slit in the foam where the boat would rest, half-buried in sand over time. I then covered the beach in playbox sand I liberated from my kids sandbox. This is done by covering everything in white glue then sprinkling on the sand.  Once its dried I sprayed on a wash of (roughly) 1/5 glue/water, which sealed everything in place - the finished piece is actually rock hard once it all dries.

The water effect is simply 5 minute epoxy that had a couple drops of blue paint in it (you need a surprisingly small amount of paint for this - a few drops for 5oz of epoxy is more than enough). It took two batches,  total of 10oz of epoxy,  to cover everything.  This next shot is after the first batch:


The next step was to make the pirate ship look old.  I started by breaking a couple of the mast bits that hold the sails.  Then I Dremel'd a hole in the bow of the ship.  Once the structure was wrecked, I spray painted the whole thing black.


After that I painted up the ship using basic craft paints, first to look like it was new, then weathered it so it looked old, adding extra greens and browns to look like lichens and molds.

Once the ship was ready to go, I took the whole assembly and put it in front of my TV.  To add ambience I put an image of the Milky Way on the screen.


If you notice, the lights from the room reflect on the TV screen, and the camera picked those up really well.  So I had to turn those off and use Lume Cubes placed well off to the left side.  This gave me a very low light to work with, so I had to use long exposures to get the shot.

I found that the best look was from using my hand to mask out the sand from the lights for most of the shot, only letting it through for the last couple seconds of the exposure.  This made the ship brighter in frame and stand out more.  I also had to turn the brightness of the TV way down otherwise the background would wash out - not something most people normally have to deal with when shooting the Milky Way.

After a bunch of trial and error with timing, I finally got this shot with a 15 second exposure:

That is the shot I submitted to the hunt.  I was super pleased when I got this shot.  I tried to remove some of those small white reflections from the back of the boat, and along the far shoreline, but I couldn't figure that out, so I left it.

Now that the hunt requirements were done, I was free to process the image to my hearts content.  There is a lot of dodging and burning, some adjustments of light intensity in the stars, and cleaning up of some stray reflections from the TV monitor I didn't notice in the first image. 

This is the final result:


Wednesday, October 21, 2020

Photography Scavenger Hunt Round 29: Metal

 The 29th round of the Photography Scavenger Hunt brought some interesting limitations:  no Photoshop.  None.  Every image must be straight out of camera.  For someone as Photoshop heavy as me that presented some interesting challenges.  It meant I had to build my worlds in real life, instead of in Photoshop.


This is how I built the world for the word "metal."

This was actually the easiest shot I did this round.  The concept I had right away was someone throwing up the horns: the classic rock and roll symbol anyone who has been to a rock concert knows intimately.  I had a Deadpool figure that came with his hand in that pose, so it was simply a matter of setting him up in front of a background and shooting him.

This is the straight from camera shot I submitted to the hunt:

This is the image after I processed it:


Tuesday, October 20, 2020

Photography Scavenger Hunt Round 29: Path

 The 29th round of the Photography Scavenger Hunt brought some interesting limitations:  no Photoshop.  None.  Every image must be straight out of camera.  For someone as Photoshop heavy as me that presented some interesting challenges.  It meant I had to build my worlds in real life, instead of in Photoshop.


This is how I built the world for the word "path."

I came up with the idea for using an Indiana Jones type figure going on a quest and encountering a skull cave right away. Whenever I think path my first thoughts are a path through the woods, which makes me think of either Lord of the Rings, or Indiana Jones.  I own a Kermit the Frog figure dressed as Indiana Jones so the Indiana/LotR choice was made for me.  It was just a matter of building a background to fit.

I started by taking a skull left over from last years Halloween decorations, and making a rock wall to fit it in, all out of XPS foam.  I also used some left over foam bits to make some rocks in the foreground.

I used some drywall compound to smooth out some of the edges and fill in some gaps. After that it was a simple mater of painting the foam to look like rocks.  I added some extra texture to the path, and made it browner to look more like mud, however thats hard to see in the final image.

I made a map out of muslin, aged with some brown and black inks, then drew on the map elements with a Sharpie.

When I put it all together and set up my camera, I sprayed some Atmospheric Aerosol into the scene to give a foggy mood to it.  The result, straight out of camera, looked like this:

I processed the image after I submitted it. The changes were minimal, mainly some cleanup of dust spots and visible joints on Kermit, as well as some colour adjustments and dodging/burning.  The final looks like this:


Monday, October 19, 2020

Photography Scavenger Hunt Round 29: Broken

 The 29th round of the Photography Scavenger Hunt brought some interesting limitations:  no Photoshop.  None.  Every image must be straight out of camera.  For someone as Photoshop heavy as me that presented some interesting challenges.  It meant I had to build my worlds in real life, instead of in Photoshop.


This is how I built the world for the word "broken."

The concept I wanted to use was the comic book cover for the Death of Superman issue.  It featured his ripped cape on a pole. Looks like this:

I started by making his cape.  Starting with a template of Supermans S logo cut out of cardstock, I experimented with different fabric dyes and paints to see how to make the best cape. I started with fabric markers, but they tended to bleed a lot, were uneven in colour, and generally made a mess of things.

Then I tried fabric spray paint, and that worked really well.  I glued (using kids crafting glue sticks) the logo to a piece of yellow fabric from my wife's quilting stash, then sprayed the whole thing with red fabric paint.

When I removed the stencil (which was easy as the glue had a very weak bond - its intended for paper, not fabric), I was left with a very passable cape.

Perfect!  Now to destroy it!  

I used a mix of wire brushes, nails hammered into boards, and other implements of destruction to shred the cape to look similar to the comic cover.

The next step was to make a big pile of rubble.  I used my favourite diorama material, XPS foam, for this.  I cut a bunch of concrete bricks - 1"x 2" painted them up to look grey, then glued them all in a pile.  I also made a couple broken I-beams, to give that fresh "fallen from a building" look that is so in vogue these days.  I grabbed a dead branch from outside to act as the pole. 

I then tossed the whole thing in front of my TV, and had it display a sky scene. Added some lights to catch the details in the rubble pile, then took the shot.

This is the straight from camera image I submitted to the hunt:

As is my custom for images from this round I post-processed the images after I submitted it to better match my Photoshop-y style.  At first I applied some colour balancing to this image, and called it done.  However I realized I really didn't dig the style of the image - it just didn't fit my vision.  I think part of it is the background sky - I'm just not a bold colour sort of guy.  What the hell were you thinking using that sky, past me?!?

So my processed shot is a complete redo.

I reshot the same pile of rubble and the same cape in my lightbox.  Then I composited in some ruined buildings I downloaded from PixelSquid.  I added a sky from my archives, and added some textures and smoke effects.  This is the vision I actually had in my head:


In other news, after making this image I decided to re-read the series.  All 63 comic books of it.  So I have been going through it online at dcuniverse.com.  Good stuff, comic books.  I wasn't much of a reader of them back in the day, but recently it has become one of my favourite literary forms.

Sunday, October 18, 2020

Photography Scavenger Hunt Round 29: Water

The 29th round of the Photography Scavenger Hunt brought some interesting limitations:  no Photoshop.  None.  Every image must be straight out of camera.  For someone as Photoshop heavy as me that presented some interesting challenges.  It meant I had to build my worlds in real life, instead of in Photoshop.

This is how I built the world for the word "water."

I had many ideas for this shot. At first I thought of a shot of sharks swimming in water, taken from below, so the shark silhouettes as the sunlight scatters across the surface.  It would be dramatic and awesome. I even bought two shark models to use.  However I couldn't think of a way to shoot it with the gear and water sources I had on hand.

Then I thought of the Nirvana Nevermind album cover.  If you are not familiar with that classic album (and it's a shame if you are not), the cover looks like this:


This was much more doable.  Of course. being me, I'd replace the baby (I am fresh out of those) with Deadpool, and the dollar (I'm cheap!) with a chimichanga (his favourite food).

Unfortunately, while I had a toy scale chimichanga, I lost it while setting up this shot and I couldn't locate it (its still missing). Even my wife with her mommy based super powers of locating lost toys was unable to locate it.  The 'changa is gone. y'all!  Reluctantly I reverted to one of the only other bits of plastic scale food I had on hand: a slice of pizza from my Teenage Mutant Ninja Turtle collection.

I started keeping fish during the pandemic.  I originally had a cool black moor goldfish in there (I called him Reef Vader), but he decided to shuffle off his mortal coil.  While tragic, this did have the added benefit of giving me an empty aquarium to use for water shots. Thanks Reef Vader!

I cleaned out the aquarium of all its fishy stuff (decorations, stones, filters etc.) and then set it up in my lightbox.  I filled the water up half way.  I hung the pizza on a bit of string from a board I laid across the top of the tank.

For the fishhook I used... a fishhook.   I went to Walmart to see if I could find a hook, but they didn't have any plain hooks. I ended up buying the cheapest rubber lure I could find and stole the hook from that. 

I grabbed a 6" Deadpool from my toy box, posed him similar to the way the baby from the original cover, and then simply dropped him into the tank.   From the very first test shot I knew right away the idea would work. It just needed some tweaking.

My lightbox has a set of LED lights in the top that provides a decent amount of ambient light.  The background is swappable for different colours (white, grey, black, green), but it was set up for black.  As a result the background of the shot was too dark.  Similarily, since the only light source was from the top, Deadpools front was in shadow and way to dark.

I solved the background by grabbing a piece of foamcore I had hanging around (I get them from the dollar store for.. a dollar), and quickly slapped some blue paint on it.  I dried the paint with a hair dryer, so in short order I had a nice blue background.

I also tossed a Lume Cube in the bottom of the tank to give some light from underneath to solve the shadow problem.


All that was left was to get the perfect shot.  If anyone tries getting practical effects with toys they will quickly learn there is a lot of trial and error involved.  A whole lot of trial and error.   I had several variables to work with that I had to get right every time.  First of all,  Deadpool needed to sink in the right orientation.  He also needed to be in the right pose. His arms and legs shifted a bit with each drop so he constantly needed adjusting.

He tended to flop to the left when he hit the water, so I had to drop him leaning to the right so he would flatten at the right moment in the frame.  He also needed to be dropped at the exact same spot in relation to the pizza so he would fall at the right distance from the pizza to get the framing right.

Also, If he was dropped too high he would move too fast, and bubbles would form around him.  Some bubbles are OK, but the bubbles were not to scale, so too many quickly became a massive distraction as it obscured too much of the figure.   At the same time I needed the surface of the water to be disturbed enough to catch the lights.  If he wasn't dropped high enough the water wouldn't be disturbed enough, and look flat.  Flat water didn't catch the lights and reflection enough to be interesting.  It was a delicate balance of all these factors.

I used a remote trigger on my camera so I could trigger it easily. I also had the shutter on a high frame rate, so I just had to mash the remote trigger down and it would take 14 frames a second.

I tried several times to get it just right, but I was frustrated with getting all the timing right.  Then I called my wife over to assist me with the Deadpool drops.  Eventually I figured out of he was held at the surface of the water, and he was released with a violent opening of the hand he would fall correctly, and the fingers quickly widening outwards would provide the right amount of surface disturbance, while still controlling for bubbles.

Altogether we made over 100 attempts, but due to the camera being on burst mode it took well over 1400 shots.  I eventually got the shot I needed, and this is what was submitted, straight out of camera, to the hunt:

If you notice I had kicked up some sediment or something along the way, so there is some dust in the image that shone in the lights (it is more obvious in the original photo than the smaller versions on social media).  I processed the shot to remove those dust bits, as well as adjust some of the blue hues.  This is the final result:

Saturday, October 17, 2020

Photography Scavenger Hunt Round 29: Needle

The 29th round of the Photography Scavenger Hunt brought some interesting limitations:  no Photoshop.  None.  Every image must be straight out of camera.  For someone as Photoshop heavy as me that presented some interesting challenges.  It meant I had to build my worlds in real life, instead of in Photoshop.

This is how I built the world for the word "needle."

This was one of the last image I took for this round. I couldn't really come up with an idea.  Finally, after a bunch of brainstorming I came across the idea of the story of Gulliver's Travels, where he visits Lilliput, and is sewn to the ground by a bunch of small folk.

I have an 18" Deadpool, and LEGO minifigs, so I decided to set the scene using those characters.

The scene itself is pretty simple.  I made a beach scene large enough to contain Deadpool lying down:


The sand is from the kids sandbox. The stakes are from BBQ skewers I cut down and aged with some craft paint.  Underneath I added some Sculptamold to make the land rougher, and to adjust the ground so that Deadpool looked like he was lying completely flat.  The figures neck didn't flex enough to tough the ground on a completely flat surface, so I build up that area to look like sand covered rocks.

I then sewed the figure in using some crafting string.

I carved the needle with a Dremel out of a 2/8" dowel, and painted it with metallic paint.  

Once I had  Deadpool sorted I went through my LEGO minifig collection to pick out an appropriate figure.  I wanted an older (in historical terms) look for the Lilliputian, so I picked one that looked rennaissance-y.

I then put the whole scene in front of my TV screen and displayed a sky scene on the TV itself.  

Then it was a matter of adding a couple lights to get the shadows to fall the way I wanted, and press the shutter.

The straight from camera version I submitted to the hunt looks like this:

Afterwards I processed the image.  The main difference is I made the crop to be wider, then did some minor dust cleanup, and some brightness/contrast adjustments.


Friday, October 16, 2020

Photography Scavenger Hunt Round 29: Motion

 The 3rd image in the Photoshop-free round 29 of the Photography Scavenger Hunt was for the phrase "in camera motion blur".

I had a bunch of ideas for this, all involving some sort of toy moving across the frame, and my capturing it with a slow shutter.  I eventually decided on a Teenage Mutant Ninja Turtle, Michelangelo to be specific (aka Mikey), skateboarding  down a sewer pipe.  Why?  Cause I had the figure, I had a skate board, and I already had a sewer diorama made for a shot I made last hunt.

It is a good thing I had that sewer made last time, cause I totally forgot to get a BTS shot this time, so I am going to toss in the one from the last round so you can get an idea of my shooting space:


The only change I made was to cut down the cardboard sides, and paint what I couldn't cut away black, so it wouldn't show up in camera. Otherwise what I shot was this diorama-in-a-box.

The setup for getting the shot is pretty simple, but the actual taking the image is more complex.  It may be easier to understand if you see the final image first, so here it is!

I set the camera up on a tripod in front of the scene so the camera was level with the bottom of the sewer, and so I could pan the camera and still have everything level.  Then I framed up Mikey so he was on the far right of the frame. I put the camera on a 4 second exposure.  When I clicked the shutter open, I held it still for ~1/2 a second, then panned the camera slightly, waited 1/2 second, then panned a bit more, and so on, until Mikey was on the far left side of the fame.  I timed it so the last position had about a full second of exposure so that instance of Mikey would be more solid in the frame (tho you can still see some brick work leaking through).

It took some practice but I eventually managed to get the timing just right to get the shot you see here.

As is my normal practice once I submitted my straight-out-of-camera shot to the Hunt, I processed the image further. I wasn't actually going to process this shot as it seemed pretty good as it was, but I did eventually clean up some dust spots, and lessen the brick pattern on the far left Mikey.


Thursday, October 15, 2020

Photography Scavenger Hunt Round 29: Egg

 The second image for the Photography Scavenger Hunt Round 29, that involved no post processing, was for the word "egg".

I kicked around with some ideas, but the alien egg from the movie Aliens came to mind at some point, so I decided to go with it. 

If you are not familiar, the alien egg is a slimy thing with a top that opens, and smoke/mist comes out.  I wanted to get that effect. However I was not allowed to use Photoshop, so I had to create it all in-camera.

This meant I needed to build an egg that was large enough to fit a Lume Cube light into, as well as the exit tube from my smoke machine.

My solution was paper maché. I started by blowing up a balloon, and wrapping tape around the middle to give it more of an egg shape (Else it would be round), then added the glue-soaked-paper over it:

Once the glue dried (which took way longer than I hoped: days not hours) I sliced open the top, then added some hot glue to make veins on the egg. Then I painted it up with greens and a sickly looking brown.


For the base I used some XPS foam, cut a hole in the base, and built up a rocky texture using Sculptamold.   Then I added more hot glue to make more veins, and then painted it up.


I tossed the whole thing in my lightbox, tossed in a LumeCube inside the egg, and stuck my Wizard Stick smoke machine up the hole in the base.  This image is before I added Lume Cube lights to the top (held up with a Platypod attached to the roof of the lightbox and some articulating arms).

Then it was a matter of shooting and hoping I can get the right smoke look.  I did notice that if the egg wasn't placed exactly square on the base the smoke would not only some out the top of the egg, but leak around the base, giving a nice spooky effect on the bottom as well.   I tried to balance the two.

The final image looks like this:


Of course, once the image was submitted to the hunt I processed it like I normally do.  That ended up looking like this:


Wednesday, October 14, 2020

Photography Scavenger Hunt Round 29: Coffee

 The latest round of the Photography Scavenger Hunt is just ending.  This round had a twist:  all images must be straight out of camera - in other words:  no photoshop!

[insert shocked expression here]

I didn't want to compromise my style so I tried to go the opposite route and build all the stuff I'd normally composite in Photoshop in real life.  

Challenge Accepted.

This is how I got the shot for "Coffee"

The concept was simply Death stirring a giant cauldron of coffee, ya know, as Death does.  I really have no idea where the idea came from - I just thought of it, and dang it, I am going with it.

I did a crappy job of capturing the behind-the-scenes shots, so you're going to have to use your imagination here, but I started with the cauldron.  Giant cauldrons at toy scale is the same as coffee mugs at human scale, so I started there. I wanted a metallic look tho, so paints would be required. I cut out a skull design from cardboard I got from a cereal box (Shreddies, if you must know), and glued it onto the mug. I then painted the whole thing with fleckstone paint (for texture) and a black primer (cause black).  I then drybrushed on some copper to get that old metallic feel.

Disaster almost struck tho.  I sprayed on a clear coat to protect my paint job when the mug slipped and fell onto the ground, breaking into 3 pieces.   It sucked.  It sucked a lot.  I may have cursed.  Heck, I know I cursed (Cursing is good for the soul when you've witnessed some of your best work shatter on the ground - try it! (the cursing part, not the best work shattering part)).  I decided to make the cracks part of the story, and glued it back together.  I then fixed the paint job and hoped for the best.

Death is stirring the coffee, so he needed a spoon.  I didn't have a giant Death sized spoon, so I carved one out of popsicle sticks.  I don't have a BTS of the spoon I used, but I have one of some oars I made for another shot (and never used), so you can use your imagination:

I made a pile of firewood out of sticks from the tree in my front yard.  The back wall is a simple paint job on foamcore, and the sign is a sign I made in Photoshop (yep, photoshop is allowed up until the final click of the shutter, from then on its no-touchy)

To get the shot I put a Lume Cube under the cauldron.  I also stuck a Lume Cube in the cup itself.  Then it was a simple matter of spraying in some smoke from my smoke machine, and shooting (and praying the smoke all looked good).

This is the shot I submitted to the hunt:
Once I had the shot submitted, I decided to process it anyway just to see the difference.  This is the Photoshop'd result: